Focus and the Five Schools
Table of Contents
Overview
Note: This guide contains spoilers for The Second Dream. Please do not read further unless you have completed it or do not mind spoilers.
Focus is an Operator progression system unlocked after completing The Second Dream and expanded through The War Within and The Old Peace. It functions as a skill tree, allowing you to develop your Operator's void powers according to one of the five Tenno Schools: Madurai, Zenurik, Naramon, Unairu, and Vazarin. Each school supports distinct playstyles and offers a mix of passive and active abilities that can benefit both your Operator and your Warframe.
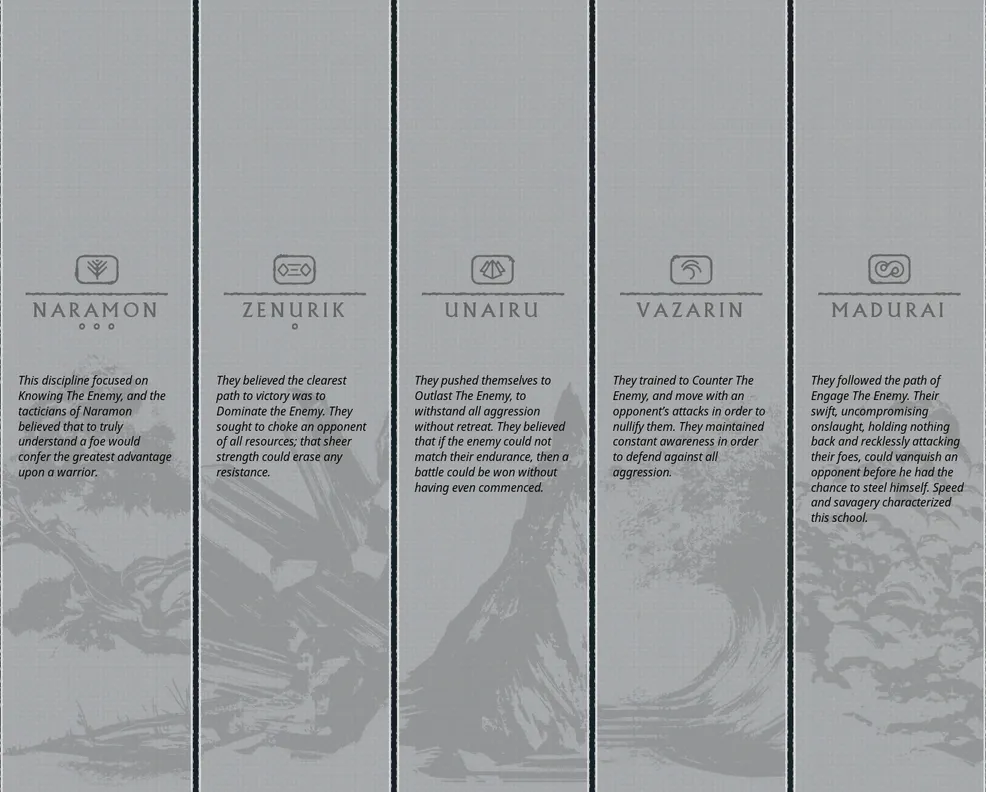
The Five Focus Schools
At the end of The Second Dream, you'll be asked to choose one of the five Tenno Schools. Don't worry about picking the "right" school. You can swap schools freely between missions and are encouraged to invest in multiple schools over time. Here's a brief summary of each school's benefits:
- Madurai (School of the Fighters) - focuses on damage buffs
- Vazarin (School of the Protectors) - focuses on healing and defensive buffs
- Naramon (School of the Tacticians) - the school for melee enthusiasts
- Unairu (School of the Indomitable) - focuses on resilience (armor, knockdown resistance, conditional revives) and defense stripping
- Zenurik (School of the Arcane) - the school for casters and energy sustain
Each school initially has 2 passive ability nodes, 6 active ability nodes, and 2 Waybounds to invest Focus into.
Waybounds are unique nodes that can be "unbound" from the focus school for 750,000 Focus and a Brilliant Eidolon Shard. Once unbound, a Waybound becomes a universal passive that applies regardless of your active school. These effects range from small bonuses like increased operator health to significant effects like a self-revival mechanic when your Warframe goes down.
How Do I Get Focus?
Focus can be earned in four ways:
- Focus Lenses - Items attached to your gear that convert a portion of excess affinity into Focus. There are four tiers (Regular, Greater, Eidolon, and Lua) that convert between 2% and 5.5% of excess affinity.
- Convergence Orbs - Yellow glowing pickups that grant 5,000 Focus to your active school and multiply affinity-to-Focus conversion by 10x for 45 seconds. These spawn periodically as long as you have a lens equipped.
- Eidolon Shards - Can be converted directly into Focus through the Focus school menu. Shard conversions also ignore the daily Focus cap, which is handy when you need more Focus and have reached your daily limit.
- Thrax Enemies and Void Angels - Grant Focus to your active school on death. No lens required.
Focus Farming Locations
The following are commonly recommended methods for farming Focus, but they are by no means the only options. If you find a method you enjoy more, go for it.
Elite Sanctuary Onslaught (ESO) is a popular Focus farm. Enemy density is high, levels are decent, and each new Zone gives an affinity-to-Focus conversion buff that scales up to 16x. Keep in mind you will need lenses for each school you want to invest in, and higher tier lenses can easily halve your farm times.
Duviri Circuit and Zariman Cascade both have decent Thrax spawn rates, making them a solid option. Set your active school to the one you're farming for before you start. Lenses aren't required for this farm which can be a plus.
Eidolon Hunts are worth mentioning since shard conversion bypasses the daily Focus cap. However, this method is limited to only working at nighttime on the Plains of Eidolon (Earth). Based on which Eidolons you hunt, you'll get shards worth the following amount of Focus:
- Teralyst = 27,500 Focus
- Teralyst + Gantulyst = 75,000 Focus
- Full Trio = 177,500 Focus
Smeeta Kavat is more of an honorable mention, but its Charm buff can give a 300% affinity buff, which stacks well with affinity-focused farms like ESO.
Artifacts & Tauron Strikes
Note: This following section discusses spoilers for The Old Peace. Please do not read further unless you have completed it or do not mind spoilers.
After completing The Old Peace, you gain access to La Cathédrale, which houses the Devil's Triad: Marie, Lyon, and Roathe. Marie sells Tektolyst Artifacts, which permanently unlock a school's ultimate ability, the Tauron Strike.
Obtaining an Artifact
Each Artifact costs 150 of one of three resources: Lyroic Bridge, Ren Hypercore, or Ascaris Prime. These are earned by completing Perita Rebellion missions, each of which drops a different unique resource:
- Hunhullus - Lyroic Bridge
- Dactolyst - Ren Hypercore
- Vanguard - Ascaris Prime
These resources are awarded as follows:
- Each order completed grants 1 resource of the respective mission
- Defeating the boss grants 10 resources
- On Steel Path, commandeered Warframes outside of boss fights will drop 2 of any resource
Marie also offers a daily purchase of 15 of any resource in exchange for common Perita Rebellion drops.
Note: Tektolyst artifact farms can be long. If you want to reduce the farm time, speed is key. Since Perita missions have a fixed duration, more orders cleared means more Tektolyst resources earned.
What Does an Artifact Do?
Obtaining a Tektolyst Artifact adds 5 new nodes to its associated Focus tree (the strike node and 4 passives). Also, Artifacts can be modded with Antique Mods to buff your Operator and Amp and one Tektolyst Artifact Arcane.
Tauron Strikes
Each Artifact comes with a Tauron Strike tied to its school. Here is a summary of all the strikes and notable passives:
-
Thara (Madurai) - Rains explosive arrows over an area. Passives grant 30-second buffs on activation that boost strength and fire bonus arrows on damage dealt.
-
Nidri (Vazarin) - Creates a water vortex that groups and CCs enemies. Passives weaken enemies in the vortex and allow it to heal allies, heal objectives, and revive downed or dead players.
-
Vexoric (Naramon) - A massive sword strike with an energy wave. Passives summon spectral swords on activation that melee attack alongside you.
-
Cogron (Unairu) - A hammer slam that creates shockwaves and gives you a 30 sec buff that strips enemy defenses. Passives cause shockwaves to drop universal orbs and ammo, grant armor buffs, and add up to 4 additional tauron shockwaves to your melee slams.
-
Lorak (Zenurik) - Laser beam that causes enemies to drop energy orbs on death. Passives spawn spectral pages on activation that shoot lasers and provide ability buffs.
Note: Nidri's revival will work in missions where players can permanently die (e.g. Archimedea & Arbitrations). This makes Vazarin incredibly valuable for those missions.
Charging Your Tauron Strike
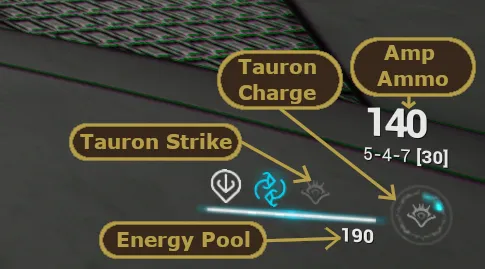
Tauron Strikes must be charged before use and charge is built in two ways:
- Enemies killed by you or allies grant 0.02% charge
- Convergence Orbs grant 20% charge and 5x the charge from kills for 45 seconds
These numbers may seem grim but there are multiple ways to boost your charge. Each lens (any tier) equipped across your loadout adds 10% bonus charge, up to 70% with 7 lenses. Lenses can be placed on your Warframe, Primary, Secondary, Melee, Amp, Heavy Weapon (requires Archgun Deployer in gear wheel), and K-Drive (requires K-Drive Launcher in gear wheel).
For example, a Convergence Orb's 20% charge gain becomes 34% with 7 lenses equipped (20 x 1.7).
Additionally, certain Antique Mods and Tektolyst Arcanes can further boost charge rate or grant initial charge on activation.
Maximizing Tauron Strike Uptime
At base, Tauron strikes take 5000 kills to charge or 5 Convergence Orb pickups. The largest contributors to gaining charge are your initial charge modifiers and your Convergence Orb pickups. Initial charge is the most valuable of the two, so I recommend using the mod, Empazu-Shol, on all Artifact builds. More initial charge is valuable but does come with trade-offs. For Convergence Orbs make sure to have 7 lenses equipped to get the most out of each pickup.
Top