Resource Farming
Table of Contents
Overview
Throughout most of the early and mid game, you're going to hit multiple walls when it comes to farming various materials. This guide covers the most effective ways to boost your drops, what options you have for farming locations, and where to go for key resources. By the end, you should have a solid plan for whatever resource is giving you trouble.
Where to Find Resources
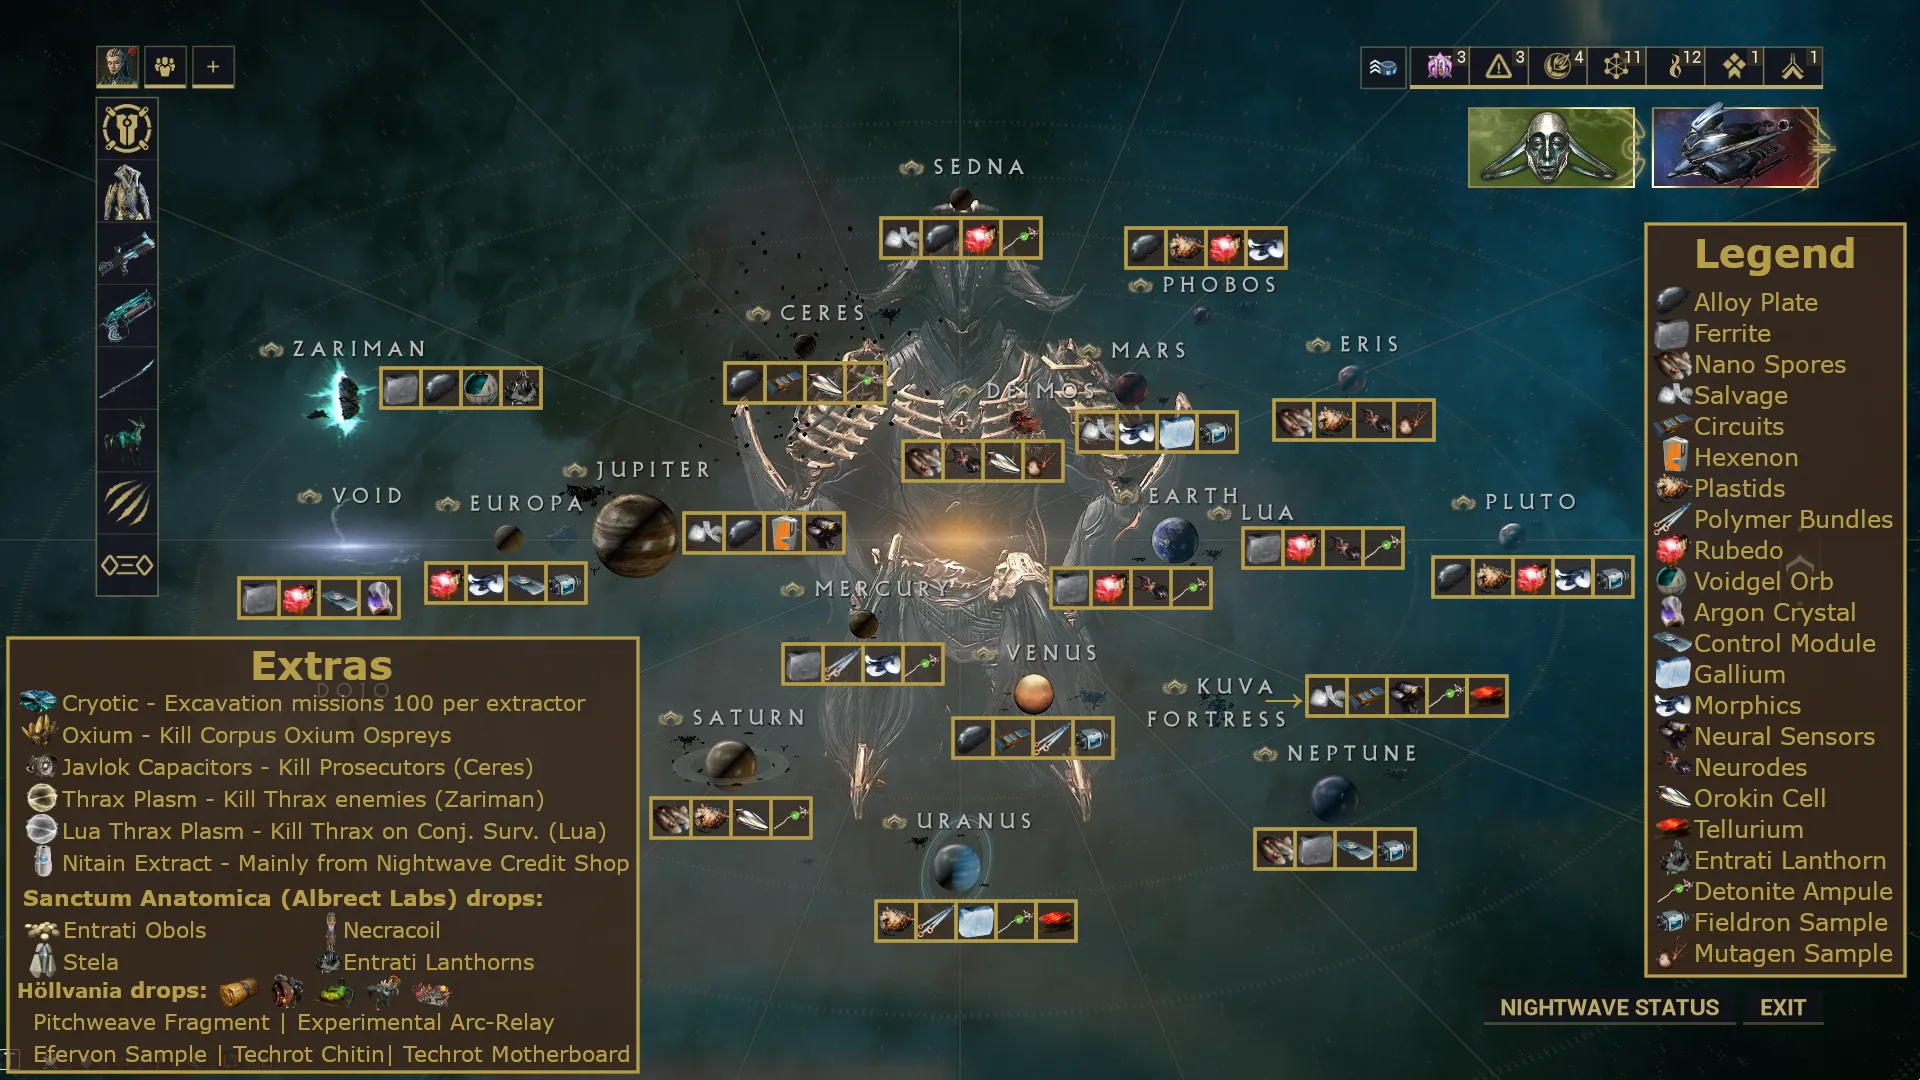
In-game, when viewing a planet, look to the bottom right corner for the Nightwave/Resource toggle button. Switch to the resource side and hover over the extractor icon to see what drops are available on that planet. Check out the chart below for a list of all the major drops for each system.
Boosting Loot
There are two main ways you're going to find resources in a mission:
- Killing enemies
- Breaking crates and specialized resource containers
Most resource optimization strategies focus on boosting the effectiveness of one of these two methods, which are covered below.
Strategy 1: More Death. More Loot.
When an enemy dies, it has a chance to drop resources. You can capitalize on this in two ways:
Boosting drop rates and values - Nekros' Desecrate - Augments (e.g Hydroid's Pilfering Swarm, Khora's Pilfering Strangledome, Atlas's Ore Gaze) - Chesa's Retrieve - Any beast companion using Resourceful Retriever
Boosting enemy spawns - Warframe missions have a spawn cap, meaning once a set number of enemies are active, no more will spawn until some are killed - Nova's Molecular Prime in speed mode causes enemies to move faster, getting them to you quicker and keeping your kill rate high, which in turn keeps new enemies spawning consistently
An ideal team composition using this can look like this: - Nekros (for Desecrate) - Nova - Khora (for Pilfering Strangledome) - Flexible (ideally a rhino or wisp that can buff the team)
Note: Every player should also run a beast companion with Resourceful Retriever for the chance to double drop pickups. If you only have two players, Nekros + Nova is my ideal combo.
Steel Path mode gives a 2x boost to resource and mod drops, so it's always ideal to run this strategy this mode if you can maintain a good kill rate. Resource boosters (orange), resource drop chance boosters (blue), and resource blessings are also great for increasing your overall drops.
Strategy 2: Bull in a China Shop
Throughout mission tiles you'll find containers that drop general loot, and specialized resource containers that drop a specific resource (like Argon Pegmatite, which drops Argon Crystals). For rare resources that you only need in small amounts (like Argon Crystals and Neural Sensors), breaking every container in a mission quickly gives a good chance of getting anywhere from 1 to 5 of that resource.
This strategy focuses on two things: moving fast and breaking containers. The ideal box-breaking options I've seen are:
- Limbo's Cataclysm with max range
- Xaku's The Vast Untime with max range
- Any fast frame with the Null Star subsume and Neutron Star augment
To speed things up, bring parkour Archon Shards, use the Praedos, and equip parkour velocity mods like Amalgam Barrel Diffusion. The same boosters and blessings from Strat 1 apply here as well, though you'll often see people skip Steel Path for this strategy. Running normal missions lets players use more offense-focused builds, and at low levels a good box-breaking ability will often clear both containers and enemies in a room.
Personal Recommendations
Below is a list of uncommon/rare resources I've been asked about and my personal farming recommendations for each. If you have a resource not on the list, let me know through my discord and I'll add it!
- Argon Crystals - Hepit, Void. Argon Crystals decay over time and are rarely needed in large quantities, so a box breaker works perfectly here. Mot, Void survival is also a decent option.
- Cryotic - Any excavation mission works. Hieracon, Pluto is a personal favorite for the added chance at Neo and Axi relics.
- Gallium - Ophelia, Uranus. Fantastic multi-purpose farm (Polymer Bundles, Plastids, Gallium, and Tellurium).
- Hexenon - Elara or Cameria, Jupiter. Elara has been consistently reliable, and Io is a nice alternative that doubles as an Oxium farm.
- Morphics - Hellas, Mars or Illiad, Phobos. For small quantities, bring a box breaker to these. For larger quantities, try Kadesh, Mars (Survival).
- Mutagen Mass, Fieldron, and Detonite Injectors - These are Invasion rewards. You can run Tier 4 Fortuna bounties, but it's generally much easier to just complete Invasions as they show up.
- Neural Sensors - Themisto, Jupiter. For small quantities, rushing and killing the boss while using a box breaker works well. For large quantities, Taveuni on the Kuva Fortress is the better option.
- Neurodes - E Prime / Mariana, Earth. Works well early on. Post Second Dream: Tycho, Lua (Survival) or Magnacidium, Deimos (Assassination) both work.
- Orokin Cells - Ceres, Gabii. An Infested Survival mission with boosted drop rates, making it great for farming large quantities of Orokin Cells.
- Oxium - Io, Jupiter. This mission consistently spawns large numbers of Oxium Ospreys, making it the go-to spot.
- Plastids - Ophelia, Uranus. Fantastic multi-purpose farm (Polymer Bundles, Plastids, Gallium, and Tellurium). For an extra strategy, the Cambion Drift on Deimos has crates that can contain Plastids, so bringing a box breaker works well there too.
- Polymer Bundles - Ophelia, Uranus. Reasoning explained above.
- Tellurium - Ophelia, Uranus. Reasoning explained above.